Restoration of 1942 Vibroplex Bug, Part 2
You can read the opening story in Restoration of 1942 Vibroplex Bug, Part 1
The Bug Has Arrived
After a month or maybe a little bit more of waiting, My bug finally arrived. It was packed well, but upon opening, I have noticed that there is something wrong with the main lever - it is not fitted in its place but taken off the frame. I initally thought it was taken off for transport, but I have soon found out that this not the reason.
So I tried to put it together with help of images and videos from the web, and found out, that the bottom bearing (or “jewel”, how the Vibroplex company is calling it) is missing from the “trunnion” screw and that the screw itself is pretty beaten up too. This kind of damage cannot be because of the shipping, because I cannot imagine how this little screw could be the only thing that was damaged - the damage would be much bigger if the improper handling with the package was the reason. The seller did not mention the screw damage in the auction listing. Nevermind, there is “no way” to return this item, so I have tried to put the main lever in the hole inside the screw and tried to put the bug under a test.
The First Test
Having zero prior knowledge about vibroplex bugs, it did not work upon the assembly, but the reason was that the bug was completely unadjusted. So I headed to Youtube and found some videos on how to set up a bug key and tried to repeat the procedure. After I thought I have it, I tried to connect it to the oscillator to test it “live”. To my surprise, after connecting, the oscillator made a continuous tone even I was not touching the lever in any way and none of the contacts were in visible contact too.
So I took a careful look and found out that one of the plastic grommets/isolators that goes through the base to its other side was missing and that one of the contact posts was directly mounted to the base, making it effectively a short circuit, lol. Also on the back side of the base plate, there was only one of the two connecting brass metals which I discovered being missing after looking at some photos of the Vibroplex bugs on the web.
So I hacked a quick paper isolators and piece of wire to fill in the missing parts just for the sake of the testing and it finally (somehow) worked, yay! However, I have slowly started noticing another odd and missing parts on this bug, so I created a list of all the things that will need to get fixed.
List Of Faults
- Oxidized screws
- Diferent sized and too old rubber feet
- Rusted chrome spots on the base
- Oxidized contacts for dits and dahs
- Missing grommets in base plate
- Damaged bottom trunion screw and its jewel
- Bent screw for setting the dah pressure
- Unaligned screw holes in the frame
- Missing screw in one of the speed-setting weights
- Missing Bottom Connecting Metal Strips
- Oxidized Name Plate
- Missing Damper Weight (Wheel)
Quite a list, huh? Let’s see how I tackled those one by one.
1 - Oxidized Screws And Springs
Majority of the screws were oxidized. The easy fix would be to buy a replacement ones. But because Vibroplex bug comes from US, it means that the screws are not metric (M screws), as we are used here in Europe, but imperial (UNC screws). What seemed to be M4 turned out to have different thread pitch etc, So they are not interchangeable, so I needed to reuse the originals. I could order those UNC screws too, but they are scarce here in Czech Republic and the bug features a lot of different screw sizes and shapes, so it would be expensive. So I decided not to do it.
I have come across this another, well documented bug restoration webpage which I am glad I found. Otherwise I would not known that the screws and springs are most probably cadmium plated, which is toxic and dangerous, and I would not be that careful. He suggests to use a Tarn-X solution which is unavailable here, so what I did is that I googled a little and found out that I can try to remove the oxide by mixing a salt and vinegar and put the screws there for about 5 minutes.
It worked and after pulling the screws out of this acidic solution, I scrubbed them with old toothbrush and then rinsed with water and left to air-dry. Some screws had heavy pits due to the rust being not just on the surface, so I mechanically removed the worst of the rust. Last step for each screw was polish it using a polishing paste “Silichrom” and a paper wipe. From what I have seen, “Silichrom” has its sibling “Simichrome” sold in US, so there are definitely an alternatives, just with another names.
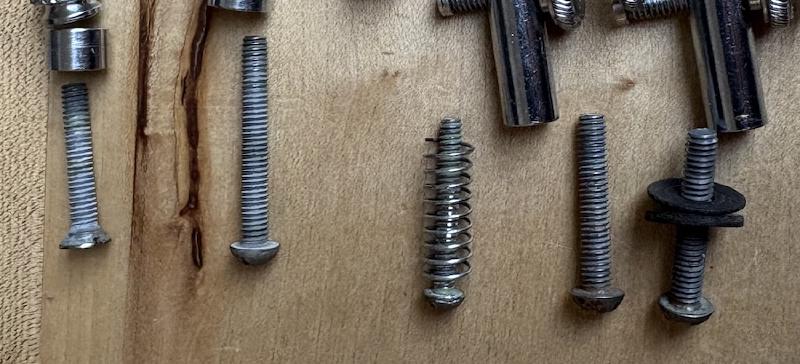
The two return springs, one for dits and another for dahs were also oxidized and looked not so appealing. I did not use tha acid solution for them, and I just polished them for a long time using q-tips, cloth and Silichrom paste. I was afraid that acid could damage their “springiness” over the longer period of time, or make them rust quickly, since they are thin. They does not look 100% polished, because of their complicated shape and because they are delicate, you cannot use a lot of force, but they turned quite allright in the end.
Anyway, I am aware that I most probably removed or at least damaged the original screw coating. I could maybe make them nickeled at some workshop or maybe even DIY, but I did not want to go that far - more time and money needed for that. So I sprayed all the restored screws with plenty of WD-40, as a precaution of potential future corrosion instead for now. Time will tell if this was sufficient. However, the screws and springs look 100% better than before, so I am satisified.
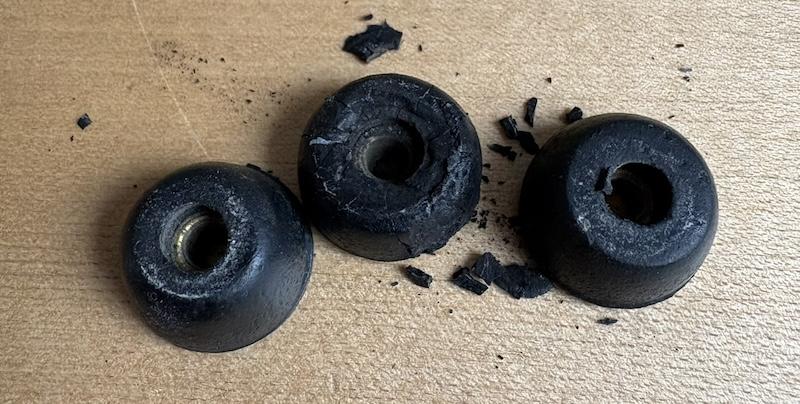
2 - Rubber Feet
Two things with the rubber feet. They were very old, so they were hard and resembled more of a hard plastic than soft rubber and they had various sizes. I ordered set of new feet and put them to the place of the old ones.
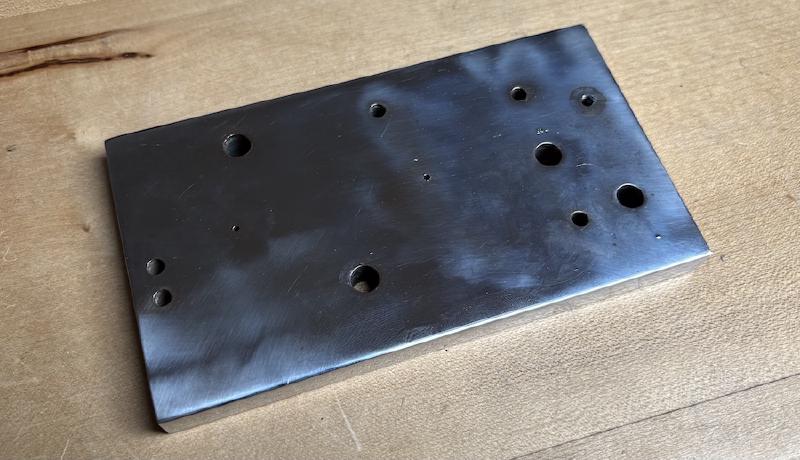
3 - Rusted Chrome Spots On The Base
The heavy metal (pun intended) base was originally coated in chrome. Given that the bug is from 1942, I think it was in pretty good shape, but it has some light scratches here and there and more importantly, there are some small rusted spots. I was trying to find if there is anything I can do with that and apart from trying to polish it, there is not much one could do, except having the whole base rechromed from scratch by someone, which is pretty expensive, so that was not an option for me.
What I did instead is that I used a felt polishing wheel with the polishing paste and polished the hell out of the base - both from the bottom side and the upper side, using the tabletop drill. This did not remove the rusty spots, nor hid them (as they are unfortunately not just on the surface), but after I removed remains of the polishing paste using isopropyl alcohol, it looked pretty good, at least the upper side.
I tried to polish the remaining rusty spots with aluminium foil and water (which is a trick I found on the web), but that was useless, so the rusty spots will stay there and I will call it “patina” from now on.
4 - Oxidized Contacts For Dits And Dahs
I have read in the other restoration article, that the contacts might be covered in silver (because the silver is superb conductor). Mine did not look like coevered in silver. They had a layer of black oxide instead. Because I was afraid of the potential silver coating, I used just a q-tip with isopropyl alcohol and scrubbed the contacts a lot. Small layer of the oxide went away, but honestly, it was about only 25%.
I spent some time searching the web on how to remove this oxide, but it involved some chemical cleaners that clearly stated in the instructions, that you should not use it on silver coating, just on “real” silver parts. Probably because the chemicals were so harsh. I could not find any cleaner that said you can use on just a silver coating. I was kind of frustrated with this so in the end, I decided that we live only once (YOLO), and again, I used the mighty Silichrom paste, witch a lot of cautious operation and in the end, with great success.
Now, the 95% of the oxide is removed and contacts looks good. They does not seem damaged in any way and apart from the years long dents, they look shiny and ready for operation. Who knows, maybe I have removed the silver plating, but as long as it works, who cares?
5 - Missing Grommets In Base Plate
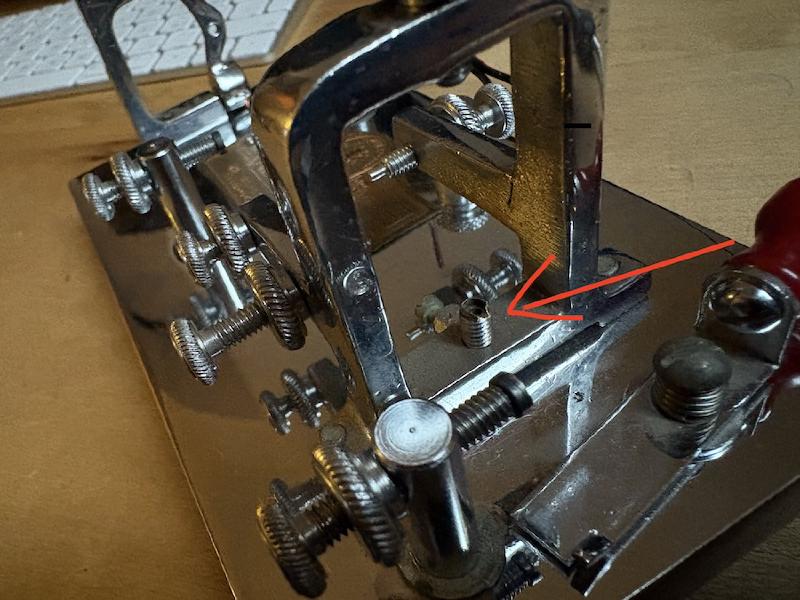
When the bug has arrived, I connected it to the oscillator to test it. But even when not touching the main lever in any way, the oscillator was making a sound - there was a short circuit. Quick check revealed that one of the columns that hold the contacts for dits and dahs (can’t remember which one was it, but its irrelevant), was screwed directly to chrome base without any isolating grommets that should be there.
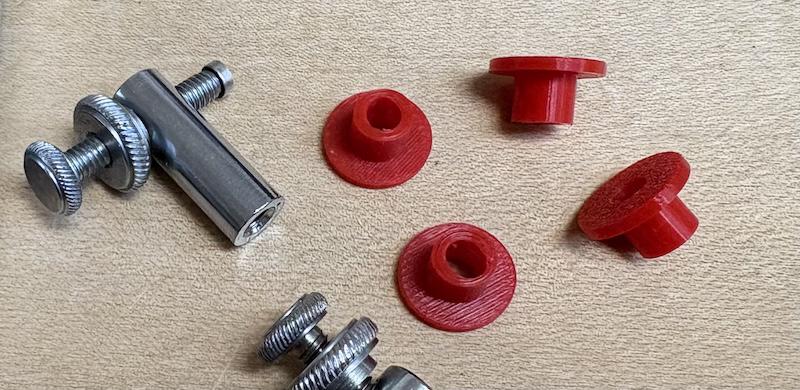
So what I did was that I looked at some photos of Vibroplex bugs on the web, and then sketched a drawing, that I sent to a 3D print guy, who printed them for me (as I don’t own a 3D printer). Original grommets are in black color, but I had an idea that it might be cool to have them in the same matching red color as the finger knobs. And I think that it was a good idea.

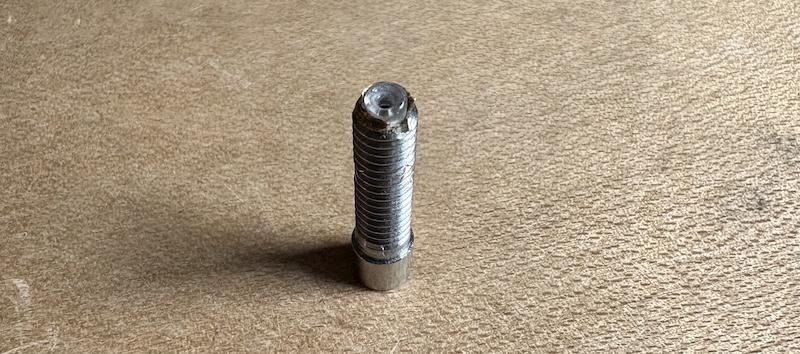
6 - Damaged Bottom Trunnion Screw And Its Jewel
The two screws that hold the level in place are called “trunnion” screws. And the little red glass-like bearing, where the main lever’s axis is placed in, is called a “jewel”. As You can see on the following photo, the bottom screw and jewel must had a hard time, because the jewel is missing and the screw is pretty beaten up.
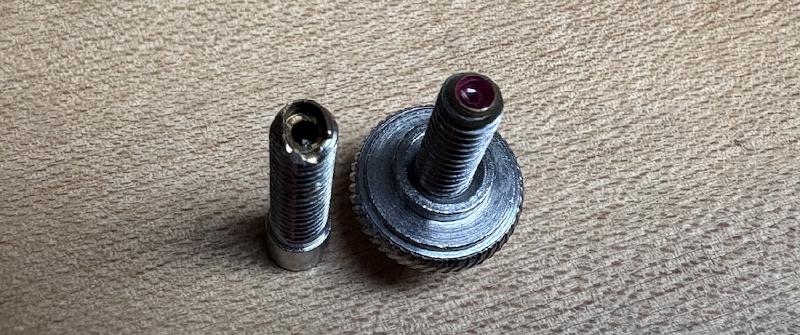
By the way, from what I have read, the jewels are only used in Vibroplex “Deluxe” models, so this probably means that this bug is (or was) a deluxe version.
Since the screw has a pretty unusual shape and also it is an imperial screw, not metric, replacing it was a financial nonsense, because screws like that are nowhere to be found here. Vibroplex company states, that they have spare parts for models older than 1945, but this is a 1942, so no luck even if I had all the money. Also, the postage fees would be nonsense, so buying spares was not an option.
What I did instead is that I took a pliers and tried to put the screw’s bent parts into the previous shape as much as possible, although a little part of the metal screw was mysteriously missing. But it did not matter for my superb fix that is coming up.
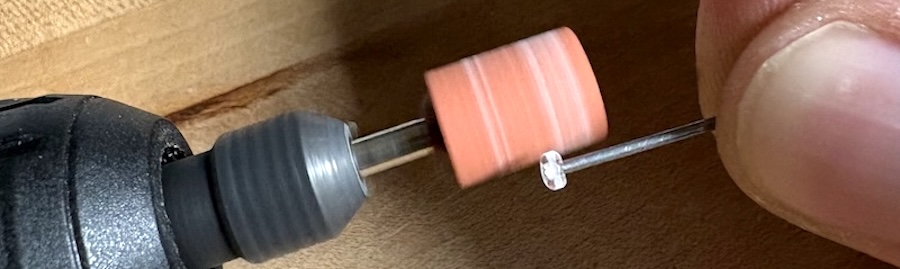
As noted, the screw was missing the jewel (bearing) for the main lever, which is pretty important part. Because the jewels are made from glass, or something very similar, I had this crazy idea of taking a simple small glass bead, that people use for making necklaces, wristbands etc. and turn it into a replacement jewel.
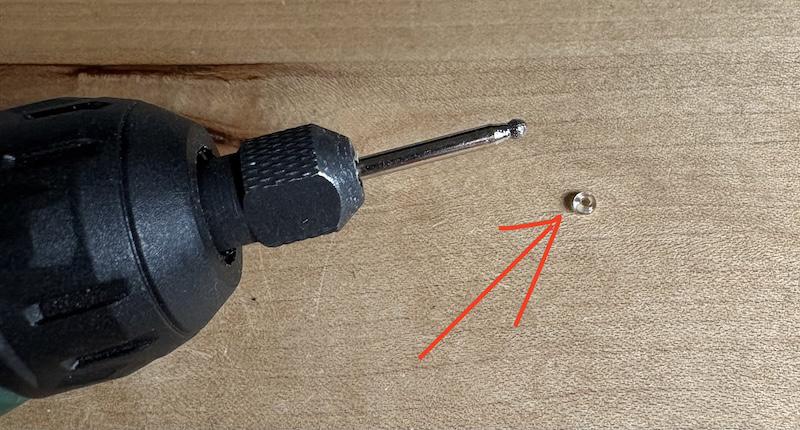
I come from a region that was famous for its glassworks back then, so it is not hard to get the glass beads here. And my wife even had some in her stash, so I asked her, what is the smallest glass bead she has. She handed me bunch of small transparent glass beads to play with. The glass beads had about 3mm in diameter, but the hole in the trunnion screw for the jewel is about 2mm only, so I needed to find a way how to make it smaller.

Here comes the fun part. I took a Dremel and I simply grinded off the glass around the perimeter until it reached 2mm in diameter. I must say that I was genuinely surprised that it worked. Next, the bead has a center hole where you put a string while making a necklace, which is cool, because you need a hole where you put an end of the main lever’s axis. But this hole was too small, so I took a small conical grind attachment and used Dremel again to enlarge the hole so the axis will fit. Again, it suprisingly worked!